Using DataLoader with NestJS

NestJS is a powerful framework to develop server-side applications. With GraphQL support, it is easy to create scalable services easily with NestJS. Dataloader plays a crucial part in developing high perfomance GraphQL services. It eliminates the N+1 problem allowing services to be more responsive. In this small article, we will discuss how I integrated Dataloader into a NestJS application.
NestJS and GraphQL ✨
I used NestJS for one of my recent projects. NestJS provides a scalable architecture for building complex projects. It is also platform agnostic, you can use Express or Fastify under the hood without a problem. This is not limited to just monolithic services. It supports Microservices out of the box as well. One of the key features in NestJS is the powerful Dependency Injection(DI) pattern which allows developers to maintain a clean codebase.
GraphQL is a query language for APIs. Instead of settling into specific API endpoints like in RESTful architecture, you can expose data and relations, then query them as you need. This makes GraphQL flexible enough to handle multiple client types like Mobile/Web or handle the requirements of multiple teams easily.
GraphQL plays nicely with Nest. Thanks to platform-agnostic architecture we can easily plug a GraphQL layer into a Nest application. Nest provides two methods to develop your GraphQL layer. Schema First and Code First. I prefer the code-first approach. You can read about GraphQL integration here.
What is Dataloader 🚀
If you have used GraphQL before, you might probably have heard of the N+1 problem.
GraphQL uses atomic resolvers to resolve your data independently. It might call the underlying service more often to fetch the same data during one query/mutation.
Dataloader was introduced to solve this problem. It might look like a BlackBox at first. But it's a simple memoized cache with a limited lifetime. When someone requests data, the Dataloader will attempt to find it in the cache or load it from the data source. To learn more I recommend reading the following article by Marc-André Giroux.
Before move on 🚨
I assume that you have used NestJS and know the fundamentals. If not please follow the official guide and go through it. If you don't know GraphQL this is not a tutorial where I explain everything. Nest has an amazing approach to GraphQL, please follow this guide to learn.
You can find the source here.
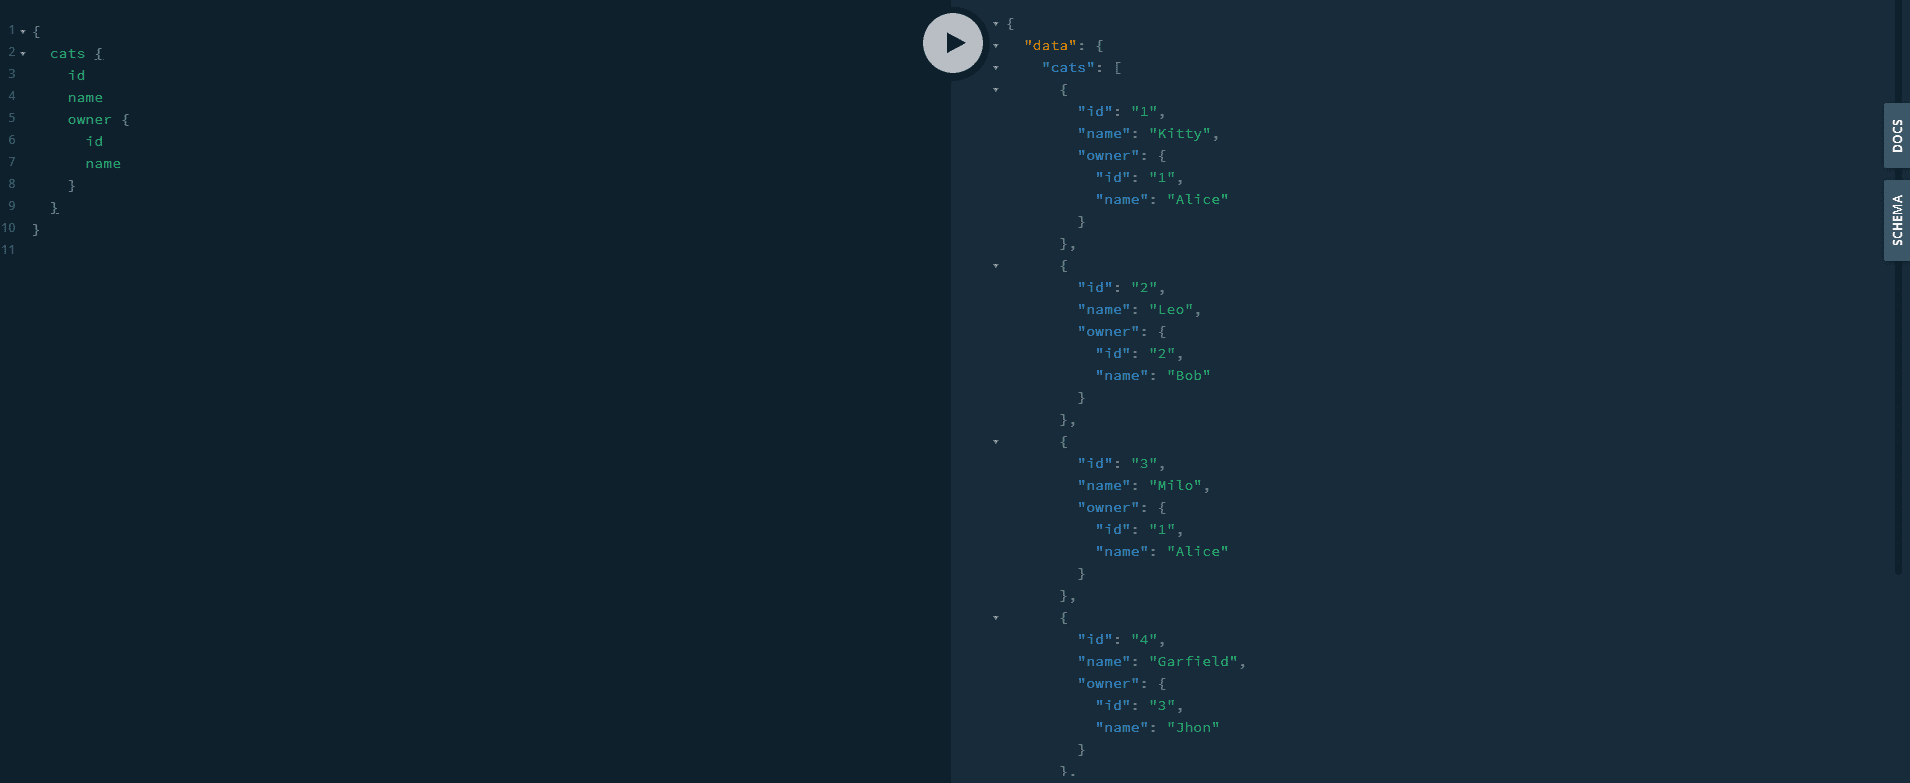
Let's define the schema 🔨
Imagine a GraphQL schema like follows. In here a Cat has an Owner.
type Owner {
  # ID of the owner
  id: ID!

  # Name of the owner
  name: String!
}

type Cat {
  # ID of the cat
  id: ID!

  # Name of the cat
  name: String!

  # What this cat likes
  likes: String!

  # Owner of the cat
  owner: Owner
}
Let's define this with Code First approach in Nest.
@ObjectType()
export class Cat implements ICat {
  @Field(() => ID, { description: 'ID of the cat' })
  id: number;

  @Field(() => String, { description: 'Name of the cat' })
  name: string;

  @Field(() => String, { description: 'What this cat likes' })
  likes?: string;

  // we dont expose the ownerId in the schema
  // instead lets expose it via a field resolver
  @HideField()
  ownerId: number;
}
Now let's define our resolver to handle this. As you can see we are not exposing ownerId to the GraphQL layer.
Instead, we will use a field resolver to resolve it when requested.
In REST we would probably have used a JOIN to eager load the relation when requesting the Cat. With GraphQL we can load the Owner only if it is requested by the client.
Resolver code would be like follows
@Resolver(() => Cat)
export class CatsResolver {
  constructor(
    private readonly catsService: CatsService,
    private readonly ownersService: OwnersService,
  ) {}

  @ResolveField(() => Owner, {
    name: 'owner',
    description: 'Owner of the cat',
    nullable: true,
  })
  getOwner(@Parent() cat: Cat) {
    return this.ownersService.findOwnerById(cat.ownerId);
  }

  @Query(() => [Cat], {
    name: 'cats',
    description: 'Loads all cats',
    nullable: 'itemsAndList',
  })
  getCats(): Cat[] {
    return this.catsService.allCats();
  }
}
In here ResolveField will resolve the value for us using the ownerService. @Parent decorator is used to get the parent object of the query.
In our case it is the Cat which contains the ownerId.
Let's fetch cats with owners
If we take a look at database logs, we can see that it is loading the same item multiple times within a single query.
loading all cats
loading owner 1
loading owner 2
loading owner 1
loading owner 3
loading owner 1
This is because multiple cats have the same owner. GraphQL doesn't know it has already loaded the same user. Let's add Dataloader and fix this 🚀.
Adding Dataloader 🔥
Add Dataloader to the project by running
npm install --save dataloaderDon't forget to add "esModuleInterop": true to your tsconfig.json
{
  "compilerOptions": {
    "esModuleInterop": true,
    // others
  }
}
Then we can import dataloader by simply using
import DataLoader from 'dataloader'Integration in a Nutshell 🐚
This is the outline of the process.
- Create a
dataloadermodule - Import the services that knows how to load data from sources(for example
UserServicefromUserModule) - Create a
createDataloaders()method, which initiates new set of dataloaders with given sources. - Add the loader to the
contextso it can be accessed by any resolver
Dataloader module 🛠️
We will create a new module to keep all dataloader related code.
Since dataloader doesn't know how to load data, we will need to provide batch functions that can load data from sources.
You will often write them in the respective modules(like a UserModule contains the logic to load multiple users).
In our case, we have OwnersService which knows how to load a bunch of owners at once from the data layer.
Let's define dataloader module
@Module({
  providers: [DataloaderService],
  imports: [OwnersModule], // we will use `findOwnersByIdBatch` to load owners
  exports: [DataloaderService], // we are exporting dataloader service
})
export class DataloaderModule {}
In here I've imported OwnersModule so I can use the batch loading method defined in that service.
Batch function looks like follows.
In here I've used a simple array for simplicity. In a production app this can be a SQL query with
whereInor an external API call
@Injectable()
export class OwnersService {
  // rest of the code ....
  findOwnersByBatch(ownerIds: number[]): (IOwner | Error)[] {
    console.debug(`loading ids ${ownerIds}`);
    const results = owners.filter((owner) => ownerIds.includes(owner.id));
    const mappedResults = ownerIds.map(
      (id) =>
        results.find((result) => result.id === id) ||
        new Error(`Could not load owner ${id}`),
    );
    return mappedResults;
  }
  // rest of the code ....
}
Pay a closer look at mappedResults array. It will ensure all the results are in the order that was requested by the dataloader.
If a certain key was not found, we will return an Error instead. ownersIds and the mappedResults should have the same length.
Dataloader service
This service is responsible for creating new dataloader instances from data sources.
Let's first define IDataloaders interface with our available loaders. It will help us later on while accessing the exposed loders.
export interface IDataloaders {
  ownersLoader: DataLoader<number, IOwner>;
  // add more loders here as you see fit
}
and the service would look like follows
@Injectable()
export class DataloaderService {
  constructor(private readonly ownerService: OwnersService) {}

  createLoaders(): IDataloaders {
    const ownersLoader = new DataLoader<number, IOwner>(
      async (keys: readonly number[]) =>
        this.ownerService.findOwnersByBatch(keys as number[]),
    );

    return {
      ownersLoader, // return a new loader
    };
  }
}
createLoaders method will create a new set of dataloaders when called.
These dataloders should not be shared with multiple requests.
Use the Context Luke ⚡
This is the tricky part. We all know since dataloaders are usually shared with Context of a GraphQL resolver.
You might be tempted to use a REQUEST scoped provider. This is a bad practice because it will recreate every dependent provider on each request.
Instead, we will inject our dataloaders into the Apollo Context with Nest.
We need to use DI to use DataloaderService in the GraphQL context. So let's initialize our GraphQLModule a factory method.
So our AppModule would look something like this now
@Module({
  imports: [
    GraphQLModule.forRootAsync({
      imports: [DataloaderModule], // <-- import module
      inject: [DataloaderService], // <-- inject service
      useFactory: (dataloaderService: DataloaderService) => {
        return {
          autoSchemaFile: true,
          context: () => ({
            loaders: dataloaderService.createLoaders(),
          }),
          // other options
        };
      },
    }),
    // other services
  ],
  // other configs
})
export class AppModule {}
Pay a closer attention to these few lines
context: () => ({
   loaders: dataloaderService.createLoaders();
}),
Here we are passing a function as the context. Nest will use the given function to create a new context for each GraphQL request(query/mutation).
We gotta do one thing more. We have setup our context, but its not Typesafe yet 😟
To fix that easily IDataloaders interface can be used.
Typescript has a nice feature called Declaration Merging.
Using this we can simply extend the IGraphQLContext interfaces provided by @nestjs/graphql package.
Create a new @types/index.d.ts file and put the following
import { IDataloaders } from '../dataloader/dataloader.interface';

declare global {
  interface IGraphQLContext {
    loaders: IDataloaders;
  }
}
and update your tsconfig.json to use these type declarations.
{
  "compilerOptions": {
    // other options
    "types": [
      "./src/@types",
      // other types
    ],
  }
}Using the dataloader 🎉
Now we are ready to use the dataloader. Let's change the previous owner field loader to use the new dataloader.
  @ResolveField(() => Owner, {
    name: 'owner',
    description: 'Owner of the cat',
    nullable: true,
  })
  getOwner(@Parent() cat: Cat, @Context() { loaders }: IGraphQLContext) {
    return loaders.ownersLoader.load(cat.ownerId);
  }
Now we don't use OwnersService to fetch the owner directly. Instead, it's using the load method from DataLoader.
This call will internally batch the request and return the requested owner.
Now our db log looks like following. Instead of loading the same owner again and again, we are loading all required owners at once. 🎉
loading all cats
loading ids 1,2,3Wrapping up ✅
Now we have a clean implementation of the DataLoader pattern in NestJS with the powerful DI. You can add more loaders and use them with type-safety.
This is how I ended up in one of my recent projects. There can be mistakes and also better ways to do the same. Let me know your ideas about this method.
You can find the source code here
See you soon, Stay Safe 😷